Recently I’ve been preparing some inventory of leatherworking products that I might be able to sell at a market. At the outset I was faced with the classic problem of anyone hoping to sell their products – how much do I charge? As a hobbyist, I’d generally been fairly laissez faire with costing what I made – I’d maybe give myself a budget on how much I could buy, but I didn’t bother to keep track of how expensive any given project was. Now that I was intending to start selling some, though, it became important for me to know what it cost me to make these things, so that I wasn’t giving them away or worse, paying people to take them.
I decided Notion was the tool for the job. This system I came up with isn’t specific to leatherworking – you can use it for really anything that takes inputs and turns it into an output. Another example might be 3D printing, where you might be interested to know how much money any given print is costing you in terms of the filament. So, what does it look like? It comes in 3 parts, materials, components, and products – I think if I was a bit smarter about it it could be done in 2, but this system works fairly well. Let’s break it down. This is a bit of a higher-level overview and assumes some basic knowledge of notion databases, if you need a more detailed introduction to Notion and its functionality you can find it here. I’ll give you a concise list of the databases and their properties at the end.
Obviously this method isn’t limited to leatherworking or businesses. If you want a system to help you with something like meal planning, it could work for that too.
Side note: I did my screenshots before including the rounding formula – so some of the numbers go to crazy decimal places. Check out this link for how to include a rounding formula.
Materials:
The materials database is where I plug in my purchases. I’ll stick with the leatherworking example but you can imagine it for whatever products you’re making – it’s the things you’re buying to put into the things you’re making. Leather? Material. Glue? Material. Dye? Thread? You get it. All materials. Mine looks like this right now. I apologize in advance for all the decimal places – you can actually fix this in your formula but I haven’t gotten around to it.
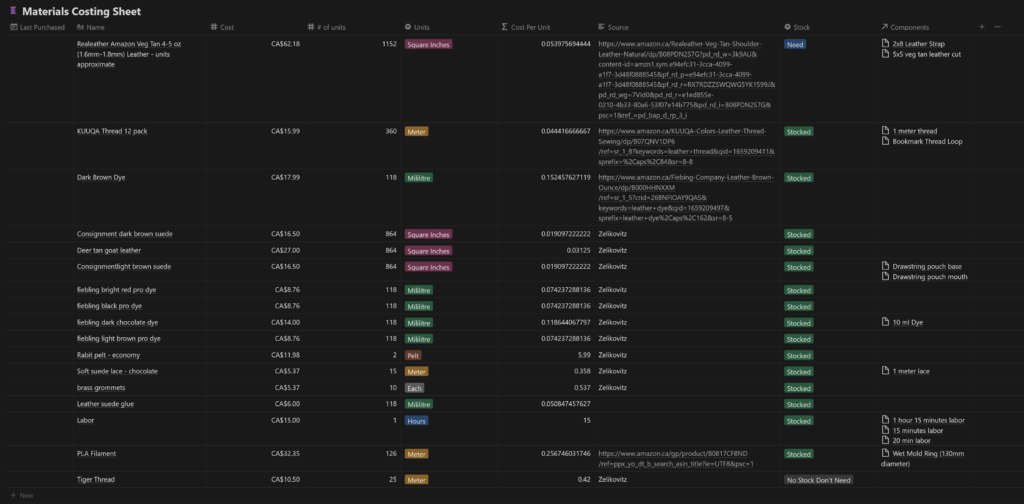
So as it is right now, basically whenever I buy something, I plug it in here. A bottle of the dark brown dye, as you can see, cost $14 for 188 mililitres, which it said right on the bottle. I enter the units, select from a dropdown what the unit actually is (for my reference), and then use a formula, ‘cost per unit’, which – you guessed it – divides the dollar amount I paid by the number of units in the bottle. The formula looks like this – “prop(“Cost”) / prop(“# of units”)” – if I buy it again another time and the price has changed, I’ll overwrite the cost so that my products’ prices change accordingly.
So every mililitre costs me 11 cents. This might seem a little too small scale – who uses just a militre of dye? – but we’ll get to that in a moment.
I capture a few extra details, like whether I have it in stock and where I got it from. You’ll also see I have a material called “labor”, which I cost at $15 an hour – cheap, if you ask me! Last on the list you’ll see a ‘Relation’ property – this links to the second database, ‘Components.’
Components
Components are the parts of a product – if I use 10ml of dye, I call that a component. What differentiates them from materials is that the ‘Components’ database can capture a quantity. The components sheet makes use of Notion’s ‘Rollup’ data type to pull data from ‘Materials’. There’s one little annoyance here that requires a workaround, I’ll get to that momentarily. Since my materials sheet has captured how much one ml of dye costs, this one will pull that number multiply it by the number of units required to give me a full cost for that component. The 10 ml of dye I ballparked for a coaster at 11 cents a militre is instantly tabulated into $1.18 in dye. Same idea for the leather, and the labor, and the other bits.
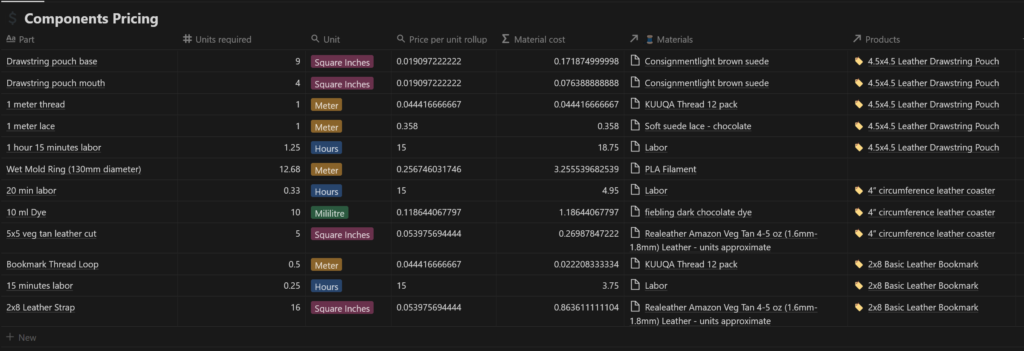
So I mentioned an annoyance. Notion doesn’t like treating the product of a rollup as a number, for some reason, so I had to create a formula field that turns the rollup into a number with “ toNumber(prop(“Price per unit rollup “)) “ – I then tabulated the material cost by multiplying that formula field by the number of units required. It looks like this (as you can see, the rollup field and price per unit formula field are identical numbers – a tiny bit less elegant, but you can hide the rollup).

So we’ve done materials and components – now for the important part – products.
Products
The last item on the list is products. Little extra work is needed here so long as your products are related to the right components and your components are related to the right materials.
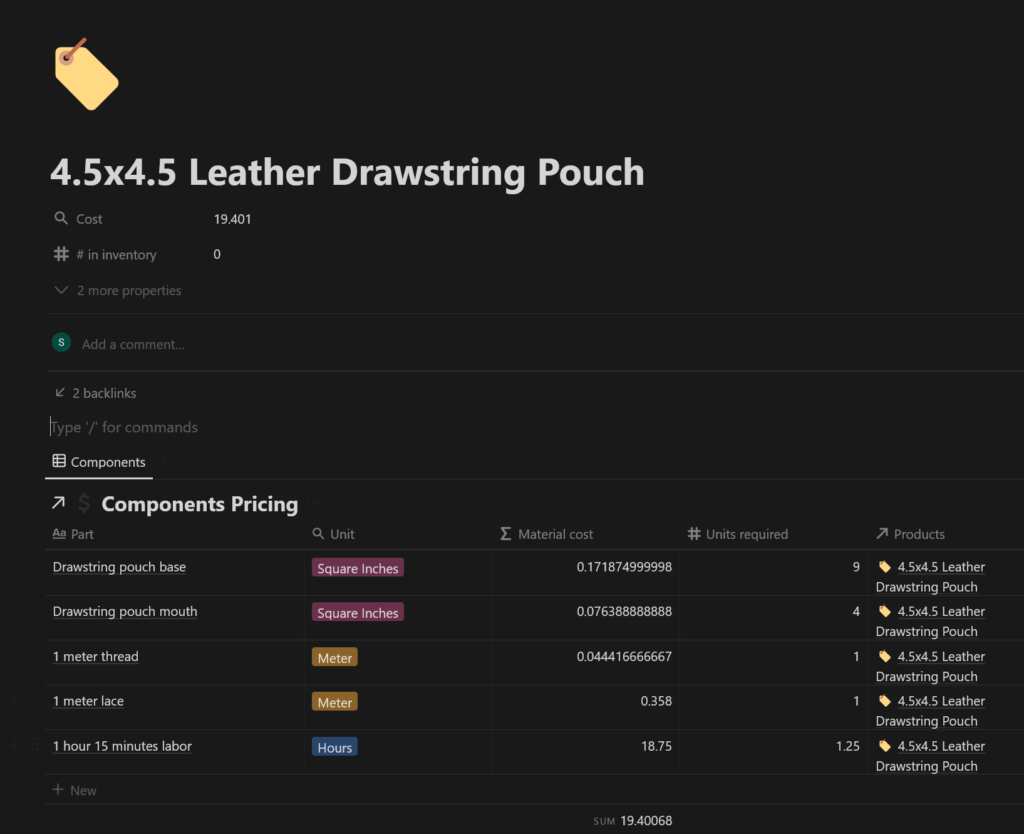
Here’s the ‘product’ for a small leather pouch. In here I created a template which automatically generates a related ‘Components’ database which will give me a complete list of what the product is made up of. The rollup function here takes a sum of all the ‘Material costs’ summed in the components database to give a complete price. So, if I was working for $15 an hour and selling at cost for materials, one of these pouches could go for $19.40. That’s uh – the friend price. You can decide what percentage markup you want for profit with this as your sort of bare minimum ‘is it even worth my time’ calculation.
What does it look like in practice?
Once your databases are all set up, I usually plan a product from the top down. That is, I start in the “products” database and create a new product, using a template. The template looks like this:

It’s very simple – the body contains a related database to ‘Components Pricing’ with a single filter – that filter is that the ‘Components’ database has a relation to the product in question (Notion will do this automatically for any new template if you select the template from the filter list – it’s extremely useful!). With this filter in place, if you hit ‘new’ to create a new item, it’ll automatically have the relationship property to your product. I also like to have an ‘All Components’ one too, which is a list of my entire components database without the filter – this is handy because if I know I’ve already made a component (like an hour of labor or 10ml of dye) I can just pick the existing one instead of making it again.
From here, I’ll create my components. Let’s say I’m making a leather bookmark which has four components – the leather, the dye, tassle, and let’s not forget the labor. I’ll create (or select if it already exists) a component for each and identify how much of each unit is required.
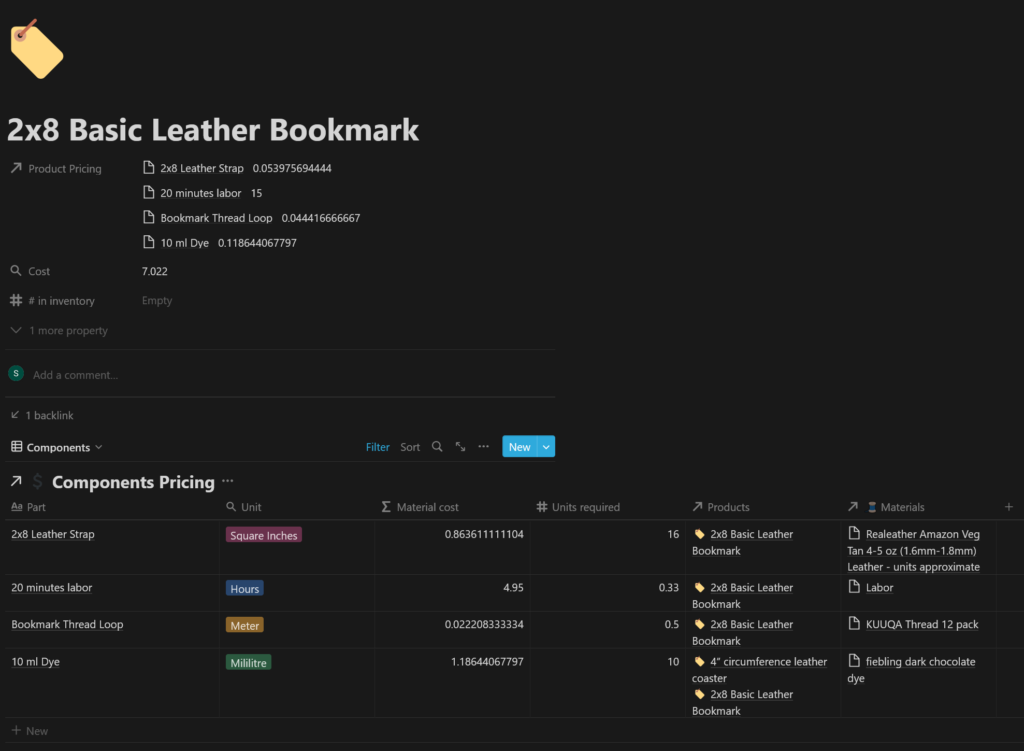
Voila!
Another thing I like about the ‘Products’ database is that if you attach an image, you can have a nice little gallery.

This set of databases can be really useful not only for pricing a project but also for planning it. Knowing what materials you need, keeping track of whether you have them, and ensuring you know what your inventory is. It’ll help make sure you don’t get stopped dead in your tracks when you find out you’re missing an essential component.
I hope this little tutorial inspired you for your own needs – by having a useful tool for tracking your expenses and possessions, whether personal or business, you can better plan for the future hopefully not be caught off guard by surprise costs!

