If you’re a Notion user, odds are you’ve played with it as a task manager or to-do list app. Today I’m going to talk about how to integrate your task list with a reward system, to help motivate yourself to check off tasks.
This method was inspired by an app called Habitica, which ‘gamifies’ your to-do list by letting you level up a character, gain coins, and use it to purchase rewards. I used Habitica for a few months earlier this year and found it pretty satisfying and motivating, but Notion’s flexibility won me back. Still, I wanted to make use of that extra motivation that a ‘gamified’ system gave me, so much like my note-taking system borrowing from the wonderful Obsidian application, I tried to mimic some of what made me tick with Habitica. I tried to make it as low friction as possible, and in the end it works quite well!
At its most basic, this system makes use of a basic task manager database and a ‘Rewards’ database. I’ll walk you through the basic properties of each, but if you’ve played with Notion at all already much of it will likely be familiar to you. It’s easy to adapt to any system you have, so feel free to improvise!
The Task Manager
A basic notion task manager is easy to configure. You may want more fields than I’m showing here (such as a date, relationships to projects, priorities, etc) but in this example version I’ll focus on the relevant fields for the reward system –
- The task name
- A status property called ‘status’
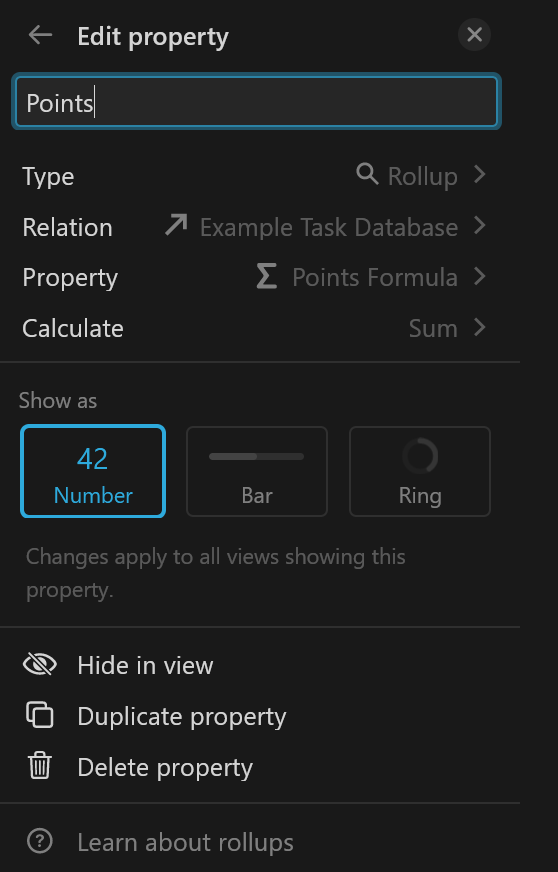
- A number property called ‘points’,
- A formula property called ‘Points Formula’
- A relation property to our Rewards database, which I’ll get to momentarily.
So the points property will be the ‘reward’ for your task. I enter a value from 1 to 10 for most tasks depending on how difficult or abrasive it is. You can have a default value in your task template, which can also configure the relationship to your rewards database. One way you might think of it is a sort of ‘hourly wage’ you pay yourself for your productivity.
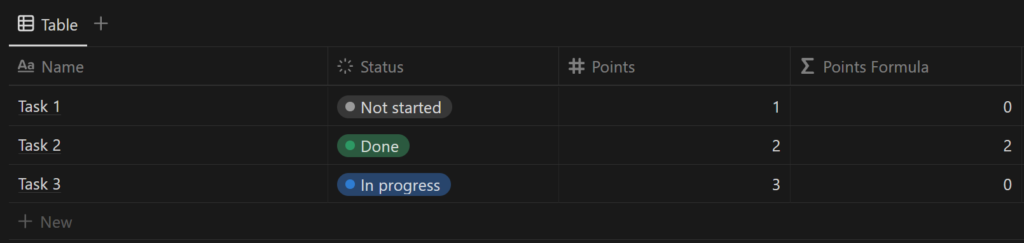
Your ‘Points Formula’ is going to check if your status is done. If the status is done it will fetch the value, otherwise it will return 0. This way, your rewards database isn’t populating with the tasks that you haven’t completed yet. This is the formula:
if(prop(“Status”) == “Done”, prop(“Points”), 0)
So far, your database should look like this:
The Rewards Database
The other half of the system is a rewards database. What rewards you want to put here and how you evaluate them is up to you – I keep it simple with a 1 point to 1 dollar value for things I want to buy, while vices and things without a monetary value I assign a value that seems reasonable. In the rewards database there are essentially two ‘types’ of items, a wallet, and a reward. I differentiate them with a tag. The purpose of the ‘wallet’ is to have a repository of all your points – all tasks will by default be assigned to your wallet, and then you’ll distribute points out of your wallet to ‘buy’ rewards.
The fields you’ll want for this database are:
- A tag field with “Wallet” and “Reward”
- A relationship property to your task database
- A number property called ‘Reward Cost’
- A rollup property which will sum all the points from your ‘Points formula’ field.
- A Status property for claimed and unclaimed rewards.
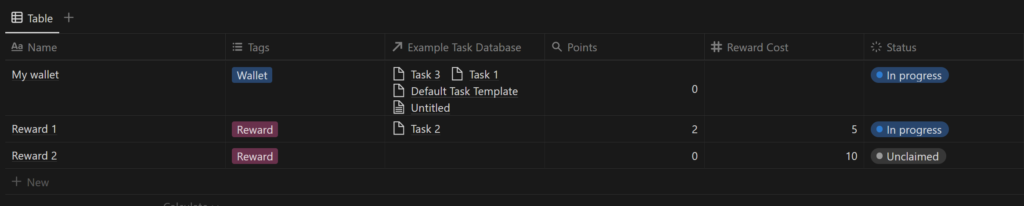
The result is something like this. You’ll notice that despite the fact that I assigned it 3 tasks with a sum value of 6 in the task database it’s only displaying 2 points – that’s because of our formula, which is only counting ‘done’ tasks. Any time you move a task to the ‘done’ status, it’ll add that point amount to your wallet so long as the task is related to the wallet.
It’s usable in its current state – all you need to do is relate a task to a reward (no double dipping!) and remove it from your wallet. But doing it this way is a little bit onerous, and you need to manually assign your wallet to every new task, which is pretty high friction. So the next steps here are to start working with templates and views to make this whole system a bit more seamless.
Setting up a Default Task Template
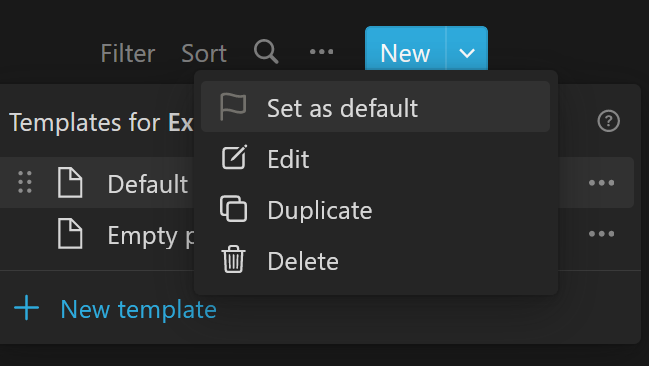
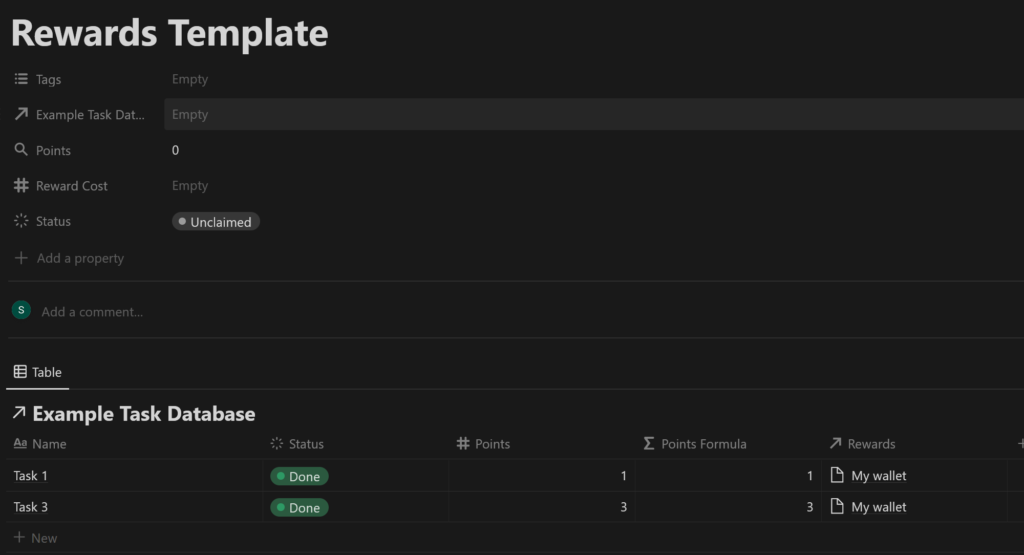
Let’s go back into our ‘tasks’ database to make assigning the ‘wallet’ to a task more painless. We’ll do this by creating a ‘Default Task Template’. If you click the arrow by the “New” button you get a ‘New Template’ option. Select that, and populate it with these values:

Next, use the same menu to set that template as the default template, and select ‘For all views in “[your database]”
Now, whenever you create a new task in any view, it’s going to use your template which relates the task to your wallet and sets a default value of 1 (or whatever number you choose). This alone will save you a lot of clicks and headaches whenever you’re assigning a new task. If you’re like me and don’t want to think about it as you’re creating and finishing tasks, you’ll still be racking up your default points. If your database has a priority system, you can even use some formula magic to add multipliers to your base value based on how high priority the task is – but I’m going to keep it simple for this tutorial. The next step is to make use of templates and views in our rewards database to make assigning points to rewards less of a headache.
The Reward Template
In my ‘rewards’ items, what you essentially want to have is a readout of the ‘points’ you’ve assigned to it and an easy method to assign them. Going and looking for tasks to take out of your wallet and into your rewards is onerous, so instead we’ll use a template. Every item in the ‘Rewards’ database also makes use of a ‘Default Template’, this one creates a filtered view of your tasks with several criteria:
- The status of the task is “Done”
- The task is related to your ‘Wallet’ (which it should be by default using our default task template) OR the task is related to your reward template.
This second step means that you will get a list of every completed item assigned to your wallet – which is essentially your pool of funds. Now, all you need to do is reassign items on this list from your wallet to your reward until the points you’ve assigned = the reward cost.
Now this is what it looks like when I use that template on one of the rewards I picked as an example
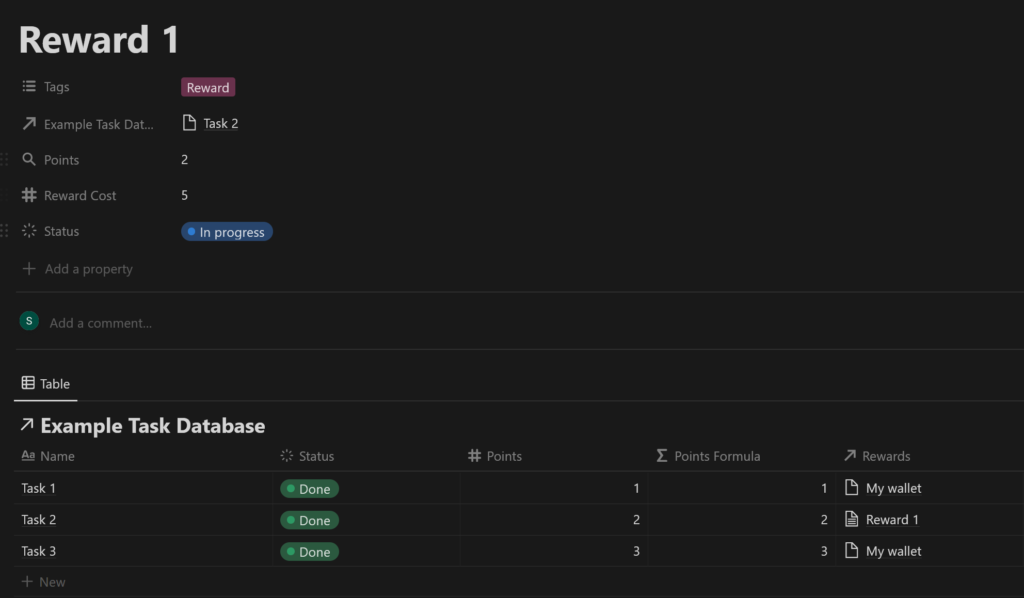
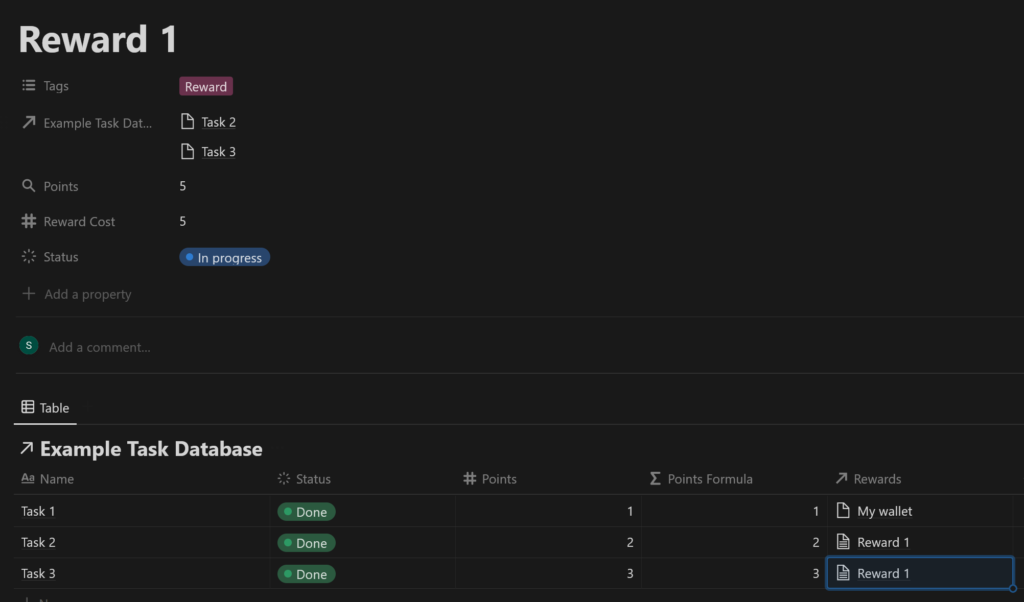
As you cans see, it shows a list of two “My wallet” items and one item – Task 2 – assigned to “Reward 1”, so the “Points” rollup shows 2 points, because that’s what Task 2 was worth. If I then also assign ‘Task 3’ to ‘Reward 1’, it’ll bring the points sum to 5, which matches my ‘Reward cost’, which means I’ve earned that reward. I usually use a copy-paste to quickly assign wallet items to the reward from this template view.
Final Steps – Refining the Rewards Database
Using formulas, we can get Notion to do the math for us on how many points we’ve assigned versus the rewards cost. There are a few ways you can do this, like for example you could use an if statement to ask “if ‘Points > = Reward Cost, set the status to done”. The way I like to do it is a % progress bar.
In your Rewards Database, add a formula called “reward progress”, which is going to simply take the number of coins we’ve assigned (the “Points” rollup) and divide it by the reward value, then multiply that by 100 to get us a percentage value.

Then select “Show as bar” on the next menu, and you’ve got a progress bar!
In conclusion
It takes a bit of legwork to set up the database, but once it’s established it’s fairly seamless to use. By using default templates we take all the legwork out of assigning tasks to our wallet or creating linked views in our ‘rewards’, which means when we create a reward, we’ll get an immediate view of all the available completed tasks in our wallet, and can then ‘cash them in’ for our chosen reward. Even if you don’t use this system, I hope some of the concepts might have inspired you to make something of your own, or an adaptation into your own system!