
I just recently finished reading Tiago Forte’s “Building a Second Brain”, and it inspired me to revisit my somewhat gunky Notion system and revitalize it. Buckle up, this one’s a doozie. If you want to skip ahead to the specifics you can start at the ‘Setting up your databases’ section, but I’ll be talking first about some concepts that I think you’ll find useful even if you don’t want to use this system.
Notion is an excellent tool, and incredibly versatile, but the abundance of opportunities to create new systems and databases within it often creates a problem of us making them over-engineered, clunky, and inefficient. One quote in particular in Forte’s book stuck out to me, because it perfectly illustrated the anxiety that had driven me away from Notion at the start of this year into Obsidian (another excellent application I’ll discuss shortly). “A perfect system you don’t use because it’s too complicated and error prone isn’t a perfect system—it’s a fragile system that will fall apart as soon as you turn your attention elsewhere.”
My quest in Notion was frequently to have things well-tagged enough that I could logically find them, sort of like at a library. It required precise data entry for my tagged filters to work right. I had a bunch of formulas which interacted in arcane ways, and I didn’t remember how half of it fed into the rest. I was forgetting where everything ‘belonged’. Forte’s concept of a second brain offered something different – he argues that the search functionality in modern applications is so good that we don’t need to spare that much sweat carefully tagging and indexing our information. What’s more important is controlling the fire-hose of information we’re bombarded with in our modern lives, saving only what’s useful to us, and making it so we can grab it when we need it. I know I had plenty of elements in my system that worked, and many of them mirrored Forte’s own ‘Projects, Areas, Resources, Archives (PARA)’ methodology, but being reminded that I could trust the search and that I should liberally archive information was a relief. You don’t need to give anything up and throw it away, just tuck it into cold storage – it’s out of your way, but there if you need it. Digital clutter is a perennial problem, but storage space is near infinite, and so the clutter really actually can be swept under the bed or jammed into the closet, if you do it wisely.
Obsidian – Zettelkasten
Before I go into the details of my Notion system I’d like to give an honourable mention to Obsidian, because it informed one aspect of my system in Notion known as ‘Concept Notes’ and ‘Literature Notes’. Truth be told I was, and still am, hesitant to choose Notion over Obsidian as the source of my ‘second brain’ because its seamless ability to hyperlink between notes and see their various connections is downright intoxicating. It has a gorgeous map of all the connections between your notes, wonderful hover-over tool tip boxes, and a huge variety of plugins that make it an exceptional software. Obsidian, to me, felt like an organic, evolving map of my thought, less structured than Notion but open to serendipity and connections between concepts which is so vital to any creative work. A note was a note was a note, and I spared very little thought on where it ‘belonged’, because the connections tended to put them naturally in a place I could find them. Even though I’m going to be telling you about my Notion system, if you’ve never heard of Obsidian I encourage you to take a look and see if it’s for you, because it offers some things that Notion doesn’t, and it’s always improving.
When I first moved into Obsidian I was inspired by a system of organization known as ‘Zettelkasten’, and many Obsidian aficionados – Obsidianados? – swear by it. I read a book called “How to Take Smart Notes” by Sonke Ahrens which described how the process influenced his digital system, and I was convinced.
So what is the Zettelkasten method? Essentially it means ‘Box of cards’, which was what it was when its creator Niklas Luhmann developed it in the days before our immensely efficient digital systems. Rather than organizing his notes by category, Luhmann would put all his notes on cards which would go into one of two boxes, one for his bibliographical information and one for his ideas. I won’t go into detail on the exact methodology, as its analogue nature is a little obsolete in our world of digital searching, but that core distinction was important to me. In my Obsidian area there was only two main folders – Literature Notes, and… Everything else.
The Literature Note folder was composed of a note for each piece of source material I’d collected information from. For example, writing this tutorial I referred to my Literature Note on “How to Take Smart Notes” to refresh myself on the Zettelkasten method. Inside that literature note I had a compiled list of all my notes I took on the book, my thoughts, everything. Not structured in any particular way, generally taken down as I read through the material. As I went recording this information, I would encounter concepts outlined in the book that weren’t unique to it – for example, the Zettelkasten Method.
And so a Concept Note is born, if I think the concept is significant. In Obsidian this was gleefully easy – two square brackets on either side of a word or phrase would create a new note and a hyperlink to it – as you can see in this screenshot. Anything in orange is a link.
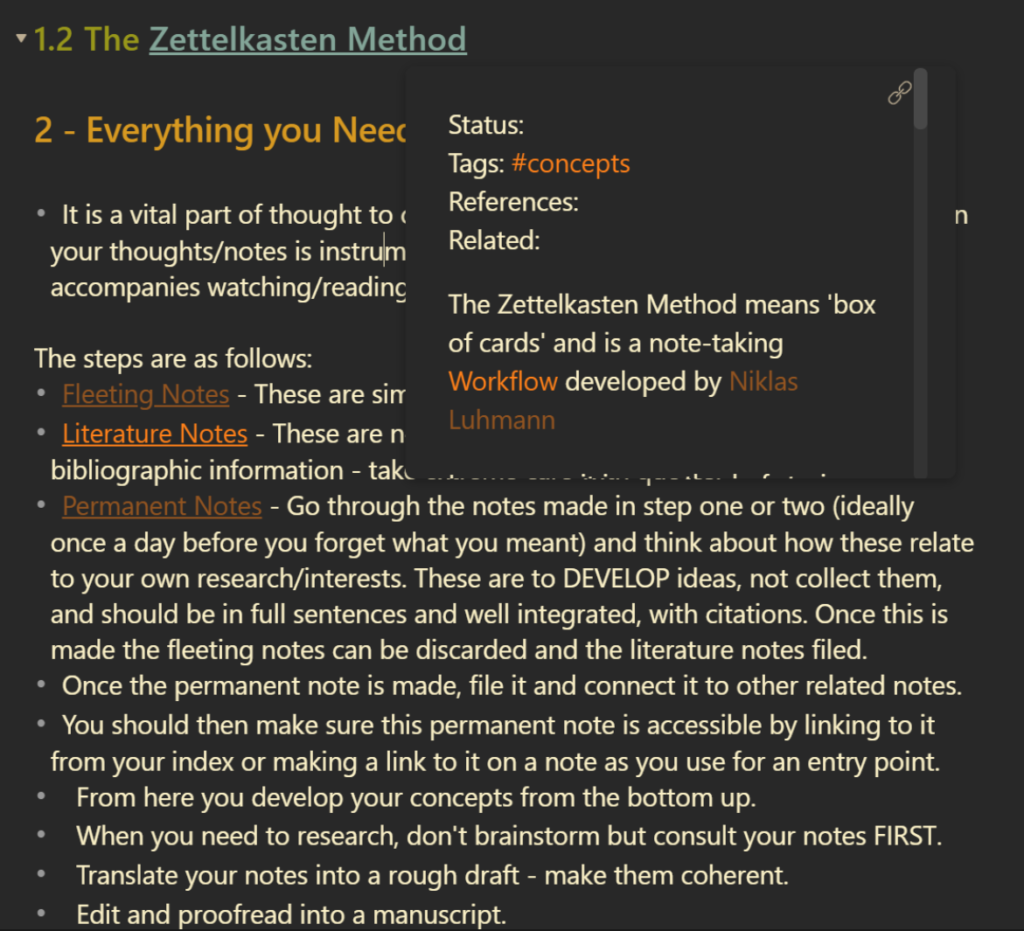
That tooltip is pointing to an entirely different note titled “The Zettelkasten Method” where I had compiled some knowledge and ideas on it. Unlike my notes on Sonke Ahren’s book, which is explicitly tied to that piece of literature, this is something you might call “Evergreen” – it’s something I could research further, study from various books or articles (each of which would have their own literature note).
Within this Obsidian system, any given literature note could have several outgoing links to other literature notes that I was reminded of, and to various concepts that they share. Obsidian could keep track of this and display it as a graph and also an ‘outgoing links’ list. Other Literature Notes are red in that graph view, and the others are concepts.

This was a magical discovery to me. Pardon my giddiness, but isn’t that so fucking cool? This system within Obsidian felt like a beautiful mix of quick capture and intimate connection between ideas. Better still, this shifted my mindset to be constantly identifying concepts that were valuable to me, and to make note of them. I had a constant easy access to my citations, it was always easy to recall where I got something from.
Anyway, this was meant to be about my system in Notion, so why all this Obsidian talk? Well, I was inspired by Obsidian’s system, but wanted my Second Brain to be able to keep track of my task management and projects as well, which I felt Obsidian didn’t perform half as well as Notion. I wanted to be able to have connections like those above, but also with my to-do list, my goals, my projects. I remembered that Notion had this handy little feature called Backlinks, and I thought – perhaps I can do something Obsidian-like, in Notion.
Now, in my opinion the linking between notes system in Notion doesn’t hold a candle to the beautiful elegance and swiftness it has in Obsidian, but it’s close enough. So let’s visit Notion now, and I’ll discuss my structure.
Notion – the PITA system
Now, I don’t want to make a step-by-step tutorial for you to 100% recreate my system. If you’re unfamiliar with the basics of Notion you can check out my tutorial here. My system is a hodge-podge of what works for me, and you should make yours the same way. Build based on what you want, what feels right, and don’t be afraid to play with it. It doesn’t need to be perfect, and it never will be anyway, so be flexible. “The perfect is the enemy of the good”, as Voltaire said. Describing the system it sounds like a mouthful, but once it’s set up and in practice it’s quite painless to use.
I came to the following structure, informed by the existing structure I’d built years ago which was divided by tasks, media, and projects with a mishmash of other systems in various levels of development, because I have a problem (quotes databases, picture databases, judo throw databases…). It was a bit of a chaotic mess, and it needed to be made orderly and sensible again. Inspired by my Obsidian workflow divided into only two categories, and also informed by Forte’s PARA system, I came up with a bastardization of all of it. We’ll call it PITA like the delicious bread (or ‘Pain in the ass’, but I like to think this system has been quite intuitive so far!).
It’s made up of four databases, ‘Projects’, ‘Inputs’, ‘Tasks’, and ‘Areas’ – I’ll quickly describe them and then talk about how to structure the database after.
- Projects – My projects database is composed of well-defined sets of tasks with criteria for completion. A renovation of your office is a project. A course at school is a project. Virtually anything that’s composed of more than one task can theoretically be a project – the important part is that it can be finished.
- Inputs – I struggled to come up with a good name for this – it used to be ‘Media’ but I felt that didn’t actually capture what I meant. An ‘Input’ is essentially any piece of knowledge or information that can feed a project or area. They’re notes, bookmarks, pictures, videos, books. I devised three main types of inputs, but they all go into the same database – I separate them with a tag, but you don’t need to. The point is that this is where your knowledge lies. Take care not to become too obsessed with tagging and ordering this stuff, we’ll get to how best to do that shortly.
- Literature Notes – That book you’re reading? Literature Note. Web-clipped recipe? Literature Note. Video on a Judo throw you’re practising? Literature Note. A Literature Note is essentially a place to store both your bibliographical information/links to the source and to take notes directly related to that thing. If you got the knowledge from an external source, the external source can be a literature note. This gives you the link back to wherever you found the knowledge, if you want to revisit it or cite it.
- Concept Note – Let’s say that video on Judo throw was talking about a throw called ‘Ippon-Seoi-Nage’. This throw is relevant to you in your project of advancing to a higher belt, and you’ve watched a few videos on it now. If you were to create a note called ‘Ippon-Seoi-Nage’ to go over what you’ve learned about the throw from your research, that’s a concept note. It stands independent of the various sources you drew information from, and this concept note is a melting pot of knowledge about the Ippon-Seoi-Nage. It belongs to you, it’s ever-green, you can change and modify and revise it. Your own creative thoughts and innovations can stem from the source material here. I’m going to show you how to make sure you can quickly and easily see all the connections between concepts using Notion’s “Backlinks” feature shortly.
- Everything Else – Your grocery list, quick notes on a project, an idea for dinner tonight, a vague story idea, et-cetera. Anything you don’t want to forget.
- Tasks
- Notion is an excellent task-manager, one of the things Obsidian was lacking which pulled me back. A task database can be as simple or complex as you like, and there are many ways to skin a cat here. Some tasks will be orphans, unrelated to projects (’Get groceries’, ‘buy new mouse’) and others will be the constituent elements to finish a project (’Submit draft’, ‘Paint walls for office’). Tasks are actions, actual things you need to do.
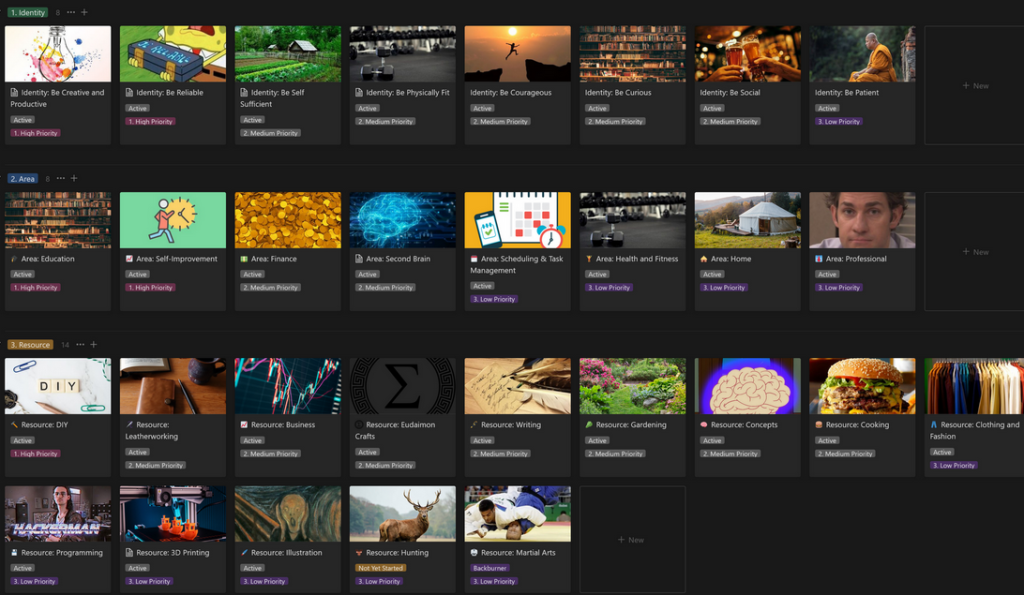
- Areas – My Areas database actually contains three tiers (ordered by a Select field) – ‘Identity’, ‘Area’, and ‘Resource’. They’re combined because they all work essentially the same way, but some are a little more high-minded and abstract than others. If you prefer you can have one catch-all category, or just take two of the three – whatever works for you. What matters here is that they can act as a nexus for concepts, literature notes, and projects.
- Identity is a bit of a tack-on and not a requirement, they could be just as easily captured as ‘Areas’ but I wanted them to be a tier higher. Identities were composed of core values that are fairly abstract – such as “Be reliable”, “Be curious”, “Be patient.”
- Areas are areas of responsibility where standards must be maintained for an indefinite amount of time. Unlike projects that can be finished, these sometimes won’t be, or at least, you don’t know when they would be. Things like personal fitness, certain job responsibilities, your home life, et-cetera.
- Resources are similar to an ‘Area’ (and structurally, in my system, they are only differentiated by a tag) but are more ephemeral. Hobbies, general interests, places to collect input by topic. Things like gardening, fashion, martial arts, or blogging. If you don’t know if something is an Area or a Resource, here’s the thing – it doesn’t matter. Put it where it feels intuitive to you, but I prefer my ‘Areas’ to be a little tidier and enduring, while resources are subject to my whimsy.
Setting up your Databases
Okay, so now you’ve seen how the PITA system is conceptualized, how does it function?
As noted before, Projects, Inputs, Tasks and Areas are each their own database in Notion. What fields you add are up to you, but I’d say a good rule of thumb is ‘less is more’ – the more metadata you force yourself to capture the less you’ll want to bother. It’s usually not worth it and it’ll just stress you out, trust me. All those perfect systems where everything is super neatly organized fall apart as soon as you stop diligently maintaining it. I’ll quickly go through the fields and connections I have for mine that I consider the most important. I’ll also talk about the templates I use for them after laying out the database structure.
Even for relating notes to areas, use a light touch. You don’t need to give every note or task an area or a project if nothing springs to mind. Also remember that one note can relate to multiple areas or projects, if you so choose, so there’s no need for one ‘right place’ to put it. I’m going to describe a slightly simpler version than the one I use – I have more fields and categories, but many of them are inessential, or holdovers from my old system.
Projects
- Relation Property to “Area” database.
- Relation Property to “Inputs” database
- Status Property – At its most basic “To-Do”, “Active”, and “Complete” are all you need, but I have a few others like “Someday / Maybe” for bucket list kind of things and “Backburner” for projects that have become inactive but would like to get around to.
Inputs:
- Relation Property to “Area” database
- Relation property to “Project” database
- Status property – Inbox is the default status, which will catch all incoming notes, web-clippings, etc to be reviewed. Then a “To-do”, “In Progress” and “Finished” status are useful.
- Select Property – “Type” – there are two options – “Literature Note” and “Concept Note”, if it’s neither, it’s in the “Everything Else” category and doesn’t need to be populated.
- Optional – I have another select field that organizes by things like “Book”, “Website”, “Wishlist” – I might do away with this as it’s more data-entry, but I also like having a “Bookshelf” view of all the books I’m reading/have read and a “wishlist” view of things I’d like to buy.
- URL field – Saves the URL of the source. If you use the Notion Web Clipper (or the ‘Notion Saver’ extension which is even more versatile!) this is extremely useful for having a link back to your source material.
Tasks
- Relation property to “Projects” database.
- Status property – Inbox, To-Do, In Progress, Done
- Optional: Select Property – Priority – How you prioritize tasks is up to you. Mine right now is a Eisenhower Matrix which has four quadrants, “Urgent & Important” “Urgent & Not Important”, “Not Urgent & Important”, “Not Urgent & Not Important”, you might just vouch for the classic “high, medium, low” method.
- Optional: Due Date – If it has a deadline, put it here.
- Optional – “Do Date”, this is nice for if you want to schedule your tasks by when you DO them rather than when they need to be done.
- Optional: Relation property to ‘areas’ database. I decided not to have this property to prevent me from using my areas as task managing centers. Better, in my opinion, for projects to be the hubs of activity. Areas
- Relation property to “Project” database
- Relation property to “Inputs” database.
- Status property – Active, Inactive
- Optional – Select property for ‘Tier’, mine are 1. Identity, 2. Area, 3. Resource.
- Optional – Select Property for priority. High, medium, low.

Putting it Into Practice
Okay, so you’ve got all your areas set up. How do we interact with this machine? Hopefully my descriptions of the concepts and the layout has already given you an idea of what to do, but let’s start by giving it something to fill it out.
Start with your projects:
I think the best way to start is for you to think about what projects you have on the go. Projects drive your life, they move you forward, they get you doing things instead of just thinking about them. Identities, Areas and Resources can sometimes be abstract, but you can probably think of at least one or two things you want to get done that could do with being broken down into smaller steps or requiring some research. “Fix my car”, “Find a new house”, “take a course”. These are projects. Add the things you have on the go, or maybe add a few you want to do but haven’t started. I put this step before starting with your tasks because I think it’s better to structure your to-do list based on what your aspirations are, not vice-versa.
Make your to-do list:
I’ll show you a handy way to make quick project-specific to-do lists with templates shortly, but for now, open up your Tasks database and write down your to-do list, if you have one. Break down your project into concrete steps if you need to – if it’s “Fix your car”, one step might be “find a mechanic”, another might be “call the mechanic.” – As you go, use the relationship property and select your project from the list. This isn’t strictly necessary, but it can come in handy if you need a project-specific to-do list, since you can filter on project.
Create a note in your ‘Inputs’ database:
Let’s carry on with the ‘Fix your car’ project. You started to find a mechanic, and doing so you googled ‘mechanics near me’ and found a handful. You want to compare prices. Well, if you have the Notion Web Clipper, you could go around clipping the website for all the nearby mechanics into it, or you could just write it down yourself into a note. Contact numbers, prices, estimated time to fix your car, whatever. It’s all handy. Relate these to your project as needed. Or maybe you’re researching something for a writing project – here is an excuse for me to go over “Backlinks” and concepts notes again.
Backlinks are the big thread between this new Notion setup and the Obsidian setup I gushed about before. I admit, it’s not as pretty or elegant as Obsidian, but it does the trick. Whenever you’re typing in a Notion note, if you enter two square brackets like [[ or use the @ symbol it will give you a list of items in your Notion database. I use this to quickly reference other notes. You can also create a new note this way, for example if you want to create a concept note for your research. This in and of itself is great, but it also generates a little list at the top of the note of all the items that have linked to it – these are your backlinks, and they’re a magical source of interconnected thinking and serendipity, if you use them well.
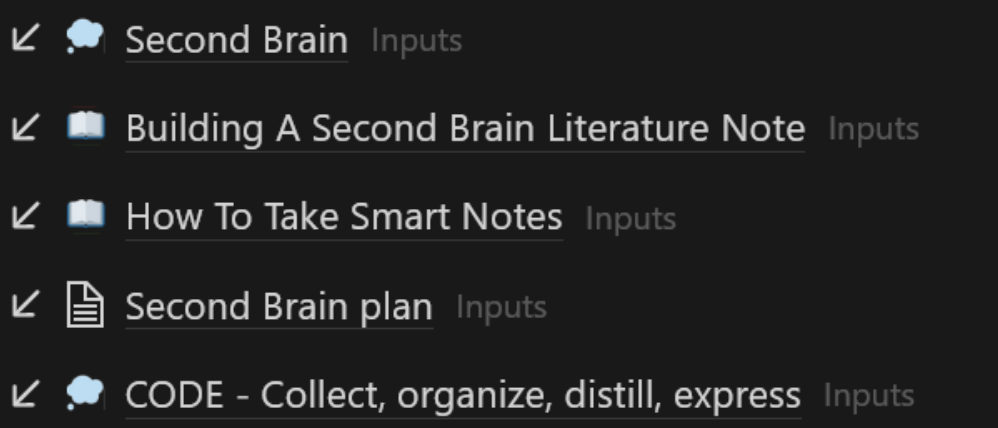
These are the backlinks on the Notion page I’m currently using to write this tutorial. The Second Brain plan was actually the document I used to intially figure out my system, but it turned into a resource I used for this tutorial too. Due to the templates I use for Literature Notes and Concept Notes they also have a handy little icon (book for literature note, thought bubble for concept note). The Second Brain plan was neither a concept nor a literature note, as it was a specific note for a specific project, but some of the ideas I had in them could go on to inform the ‘Second Brain’ concept note.
Areas and Resources
These will fill out over time. You might create a ‘Maintenance’ resource and tag your notes on mechanic research to it. That way, it’s right there if your car ever breaks down again. You might create a “DIY” area, if you conclude that you don’t want to pay a mechanic and try to fix it yourself. There’s no need to build unnecessary structure here, don’t feel compelled to fill your areas and structures before you have anything to put in them.
Setting up your Templates
Another indispensable Notion tool is templates. An empty document shows you a list of them, and they can automatically populate the body of the record with a pre-generated template that can include essentially anything.
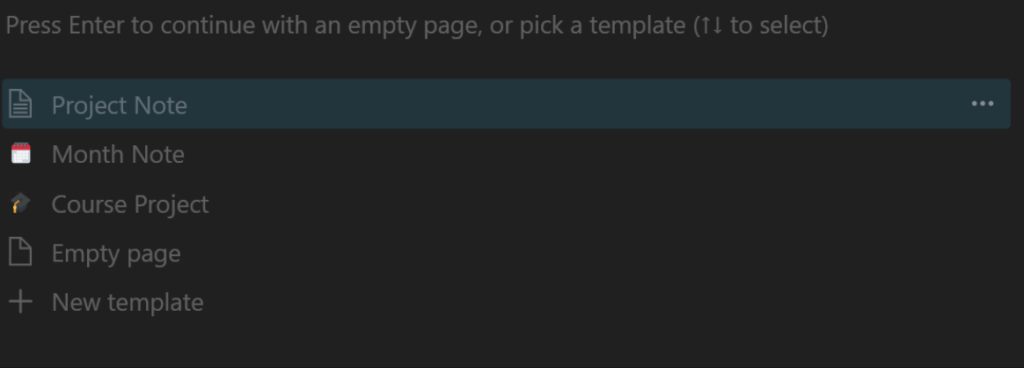
Let’s take a look at my Project Note as an example. The fundamental idea here is that you set up an embedded database of your “Tasks” and “Inputs” databases here which will automatically filter on the project you’ve created. This will give you an automatic list of anything you’ve tagged to that project (or area).
Once you hit new template you can fill out any metadata that might always be the case, and then scroll down to the body.

My template looks like this. You type /linked and select ‘Linked View of Database’ and then choose which one you want to add. Configure it however you like – I like having a quick ‘Add task’ button at the top which is essentially a filtered ‘Gallery’ view.
Then, and this is the important part, you create a filter on the database relation field. In my case it’s titled “Project” and the template is titled “Project Note”, so the filter is “Where Project contains Project Note”. This means that when you generate the template, it will filter that database for any items where their “Project” field contains your new project. And voila! An instant list of every input and to-do item you’ve tagged to your project, associated with that project. Adding tasks within this view will also automatically relate them to the project, so if you know you need to create a few to-do list items, you can add them all from your project note.
My ‘Area’ database has virtually the same template. These sections are essentially vessels to summarize my ‘Inputs’ and ‘Tasks’, where I’ve stored all the knowledge and actions required to do it. For notes on the projects themselves, I put that into ‘Inputs’. This means those notes can be tagged to other projects in the future, if I want to, without having to move them out from their home.
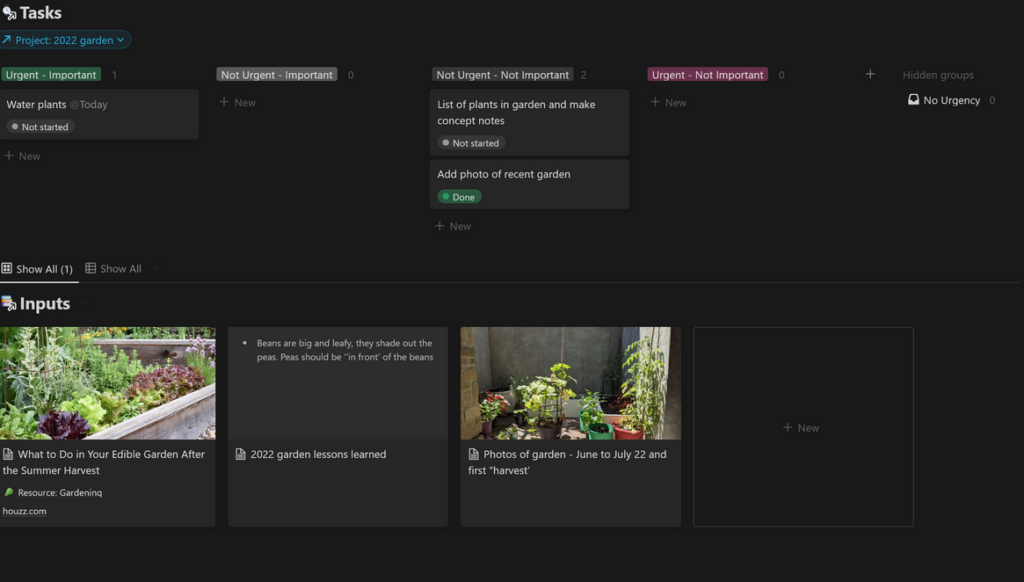
This is what my ‘2022 Garden’ project looks like. It’s a small one I just made a project note for, but it illustrates the idea. And yes, I realize how sad that little concrete prison for my garden is, you gotta make do with what you’ve got! Next year will be better, promise. As you can see, one of the articles I pinned is also related to ‘Resource: Gardening’, where I could generate a similar sort of list.
The Shadow Realm:
One last little note. I wanted a space to store things where it would be far out of the way but still accessible if needed. I created another workspace called ‘The Shadow Realm’ where I sent a big chunk of my old unwieldy system (I’m sorry, Judo throws database!). I didn’t want to totally delete it (’Wah! What if I need it!’), but I wanted it out of my face, and I didn’t want tons of old, useless database items clogging up my search. So if you have some old systems that are just getting in your way, banish it to the shadow realm.
Conclusions:
Well, that was a mouthful, wasn’t it? There’s more I could unpack and talk about but I think this has captured the important features. Some parting thoughts for you, though, on the way:
- Make your own system. Play with it. Overdo it, overengineer it, break it, patch it up, get frustrated, undo it, abandon it, revisit it, fix it. I’m only being half facetious. Systems have a natural way of expanding and scope-creeping to the point of breaking, and then being repaired and refined. Each time you do it, you’ll hone in a little closer to what you truly want out of your system. The perfect is the enemy of the good, so don’t be afraid to screw it up – but maybe at least try to keep a backup if you do something irreversible. This time next year, we both might have changed it all again – that’s fine!
- Don’t worry about the data entry or keeping everything neatly organized. I’ve heard it put this way, “Don’t build unearned structure”. While this system benefits from connecting items to projects and areas, the day-to-day work can generally be done quickly out of the Inputs and Tasks sections without any need for relating the item to a Project or Area. Now and then you’ll start a project and you can take that opportunity to search through your Inputs to compile what you need. You can’t plan for every eventuality and every future need, so keep it simple, versatile, and make use of the ‘Search’ feature. When you find you have notes or areas you return to often, refine that note or area so that it works for you.
Works Referenced
Ahrens, Sönke. How to Take Smart Notes: One Simple Technique to Boost Writing, Learning and Thinking – for Students, Academics and Nonfiction Book Writers. 1st edition. North Charleston, SC: CreateSpace Independent Publishing Platform, 2017. Associate Link
Forte, Tiago. Building a Second Brain: A Proven Method to Organize Your Digital Life and Unlock Your Creative Potential. Atria Books, 2022. – Associate Link
Pingback: Notion - A Complete Beginner's Guide - The Eudaimon