I’m a really big fan of Notion’s various database features – to the extent that I often go overboard with trying to connect all my information using Notion’s Relationships property. In this tutorial I’m going to go over the advantages of databases and relating them to one another, but I’m also going to talk about a different functionality of Notion that connects your data in a different way, not requiring the same degree of advanced planning or forcing you to maintain dozens of metadata properties. So! Let’s start with relationships, and then get into the ‘@’ functionality and ‘Backlinks’.
Databases
So first of all, what is the ‘Relationship’ property? Well, to explain it I’ll give you a brief primer on what a Notion database is. One of Notion’s greatest strengths is the ability to arrange information into databases, which can then be presented in a variety of interesting ways – they can be quickly searched filtered, queried and sorted. A database at its most simple is essentially an excel spreadsheet, with a series of columns and rows. Each row is an entry in the database, and each column is a ‘field’ or ‘property’, which represents a type of data. In Notion, when creating a database, you’re first presented with a view that looks like this:
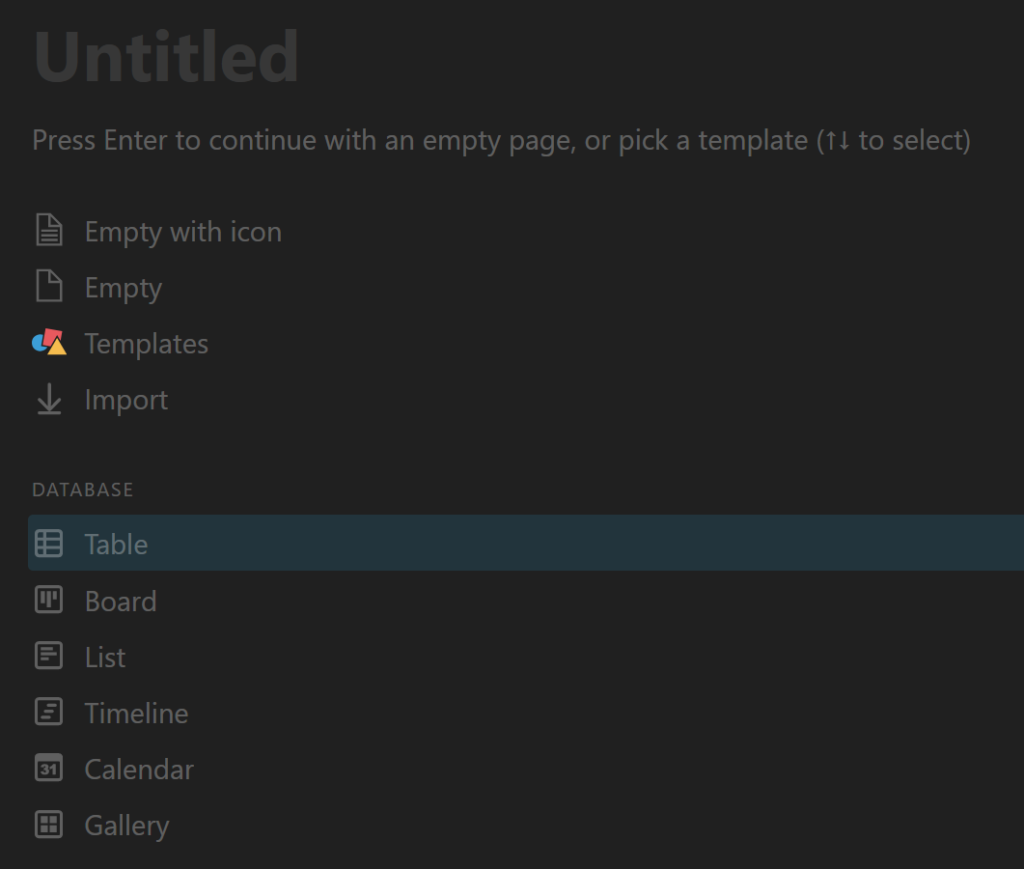
While you might think at first that these items – Table, Board, List, Timeline, Calendar and Gallery – are different kinds of database, they are in fact different views of the same information, which are the database’s entries and their ‘properties’. The most fundamental view of a database is as a table, and this is usually the best place to start. When you select one of the database options, such as ‘Table’, you may be given a few options of pre-existing databases for a ‘Data source’, but otherwise you can create a new one using the ‘New Database’ button. After that, you’ll be presented with a simple database with two columns, ‘Name’ and ‘Tags’.
Database Properties:
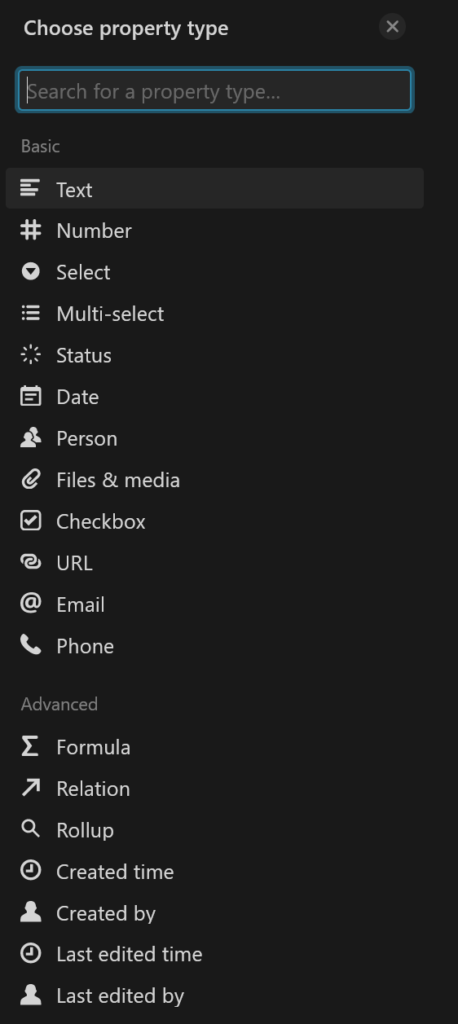
So if each row is an entry in the database and each column is a field, it’s worth understanding what a ‘field’ really is. A field is, essentially, a type of data. At its most simple it may just be an open text field that you put anything into, but it becomes far more versatile when you divide data into relevant buckets. These are the ‘Property Types’ Notion offers – most of them are fairly self-explanatory, but in this tutorial I’ll be going over some of the ‘Advanced’ properties in more detail, starting with ‘Relations’. You can find them by selecting the “+” button on the right of the column titles.
The ‘Relation’ Property
A relation property in a database is essentially an indicator to Notion that you’d like to connect that record to another database. Making use of Relations and another property, ‘Rollups’, you can start to push and pull data out of one database and into another. A simple example of this might be if you have two databases, one for tasks, and one for projects. A project is composed of tasks, but might have its own properties and metadata that you want to track – so in this circumstance, you can make use of a ‘Relationship’ property.
So here we have a primitive task tracker that I’ve set up using the basic ‘Table’ database I showed earlier.

I’ve also created a second database called ‘Projects’ which, for the sake of simple example here, only has one extra property, ‘Urgency’.

Now let’s add an additional property to ‘Tasks’ – a relationship property, to relate it to ‘Projects’. Creating the property, you are given a menu with a list of other databases. You select your chosen database and you are then presented with this menu:

The ‘Limit’ option allows you to determine what sort of relationship you want it to be. Relationships come in two forms in Notion, ‘1 page’, or ‘No limit’, this determines whether it is a ‘one to many’ or ‘many to many’ relationship. In a ‘one to many’ relationship, a task may only be able to have one related project or vice-versa. In many to many, a task may have multiple projects. Sometimes it makes sense to limit them, but generally ‘No limit’ works fine. The other option, ‘Show on Projects’, determines if you want Notion to automatically add a ‘relation’ property in ‘Projects’ so you can see all the tasks related to it. I checked it and then added the relation. Now, you might notice, you can assign your task to a project.

This is nice for several reasons. For one this means that if you set your projects up intelligently (I went over it a little in an older tutorial here) you can quickly get a list of all your tasks assigned to that project. Another thing you can make use of is the ‘Rollup’ property.
Rollups
A rollup essentially performs the role of using your ‘Relationship’ field to pull data from another database. In our simple example, the project database has an ‘Urgency’ field. So, if we want to sort our tasks by project urgency, we can use a rollup to do that. By creating a ‘Rollup’ property, selecting the project relation, and the property in the projects database, we can pull that information. You’ll also notice the ‘Calculate’ option which can, as you might guess, perform calculations based on the ‘Number’ field in another database. This can come in handy if, say, you want to sum or average a value, like if your tasks had a ‘Time spent’ field, you could use a rollup in ‘Projects’ to sum all the time spent for all tasks related to that project.

So now you’ve seen how database relationships work, you might be tempted to use it for lots of things. I had a phase where I was connecting all sorts of databases together, but there’s another Notion functionality that can create a different sort of relationship – called a ‘Backlink’.
Backlinks and linking notes
Sometimes connections between information don’t necessarily warrant a database relationship property. Say, for example, you use Notion for your journal and want to relate that journal entry to a project or task, but don’t want to break your writing flow by scrolling up to a database relationship property and connecting things together. Or perhaps you’re kicking off a project and you want to just make a quick note rather than futzing around with a database task list. Using the @ symbol in Notion provides you a very handy list of options – including reminders, people (if you share a workspace), and most importantly, ‘link to page’. If you start typing, it will perform a search for what you’re typing, and if you already have a note, it will suggest it. If not, there is an option to create a new sub-page or ‘New page in…’ which will create a new database item in the database you chose. You can even create items from templates!
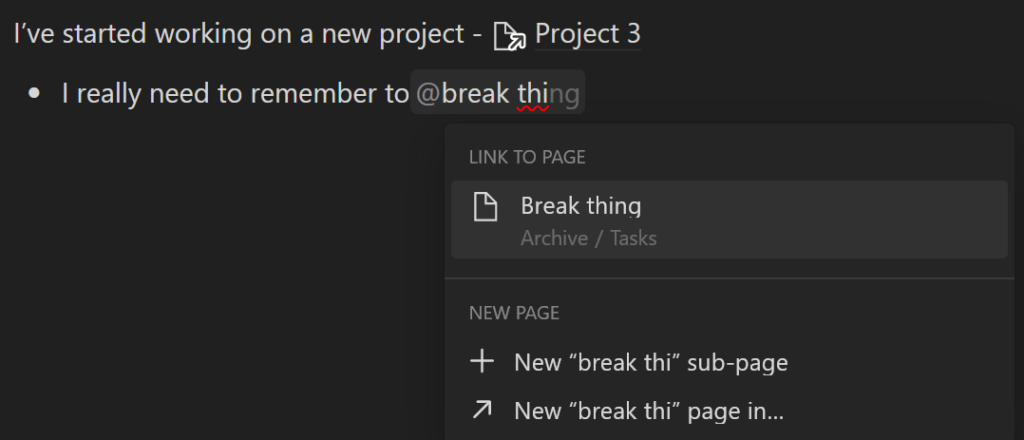
Now, in the ‘Break thing’ page, after creating that link you’ll see a little arrow that says ‘1 backlink’. There, it will show you where it was mentioned:

This method of connecting data and creating new properties is great if you like to just type out your to-do list. Using the @ symbol, you can quickly turn them into new pages or database items, and quickly see where you mentioned it. If you want to see my favorite use case for this functionality, you should check out my article on note-taking, where I use it to relate notes together and synthesize my information.

Pingback: Try this killer study-note method - The Eudaimon